Working on CMBI Projects in GitHub
At CMBI, we stand for transparent and reproducible science. The documentation and versioning of analysis scripts and software code is an important aspect. That is why CMBI encourages every employee and student to work with github, very much like wetlab scientists describe and keep track of their activities in an electronic lab notebook these days. Although github was designed as a collaborative environment for software developers, it can also be used for project management. (including document versioning) Usually, projects are kept private until the deployment of the software or the publication of a scientific paper describing the analyses or software, but one may also decide to have the project public, for example to stimulate input from the community.
Surely, there are many tutorials online on how to user GitHub. There are so many possibilities however, that it may be difficult to find your way. Moreover, we propose to use GitHub, as much as possible and appropriate, in a uniform way. Hence, this small instruction manual to explain how we use GitHub in our department.
What is Git and what is GitHub
Git is a commonly used version control system, developed in 2005 by Linus Torvalds. (who also developed the linux kernel) It keeps track of a project's entire history, including every change ever made to it. For beginners it can be somewhat hard to use, but it offers many possibilities.
Git is based on a central repository and one or more working copies named clones
,
with exchange of code-changes in between.
There's one repository per project. The repository can be on a different machine from the clone.
The git repository server 'GitHub' is a popular way to have git repositories managed. It provides additional tools and features that can make version control with git much easier. Some of them are:
- A repository server, accessible from anywhere on the internet.
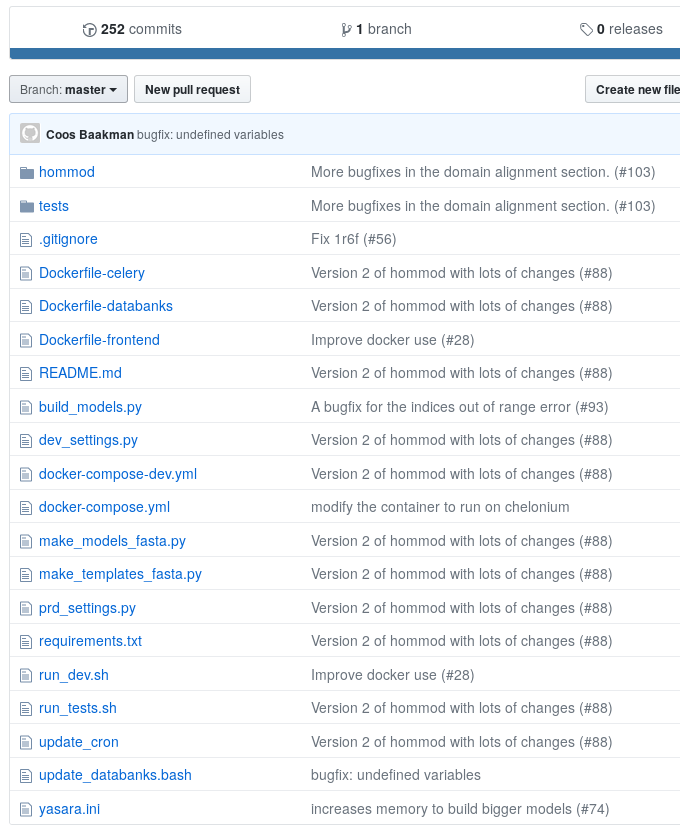
- A Web interface shown in figure 1.This interface can be accessed at the url:
https://github.com/<your user name>/<your project's name>/
- Graphical clients for Windows and Linux as an alternative to the git commandline interface.
- The option to duplicate each other's repositories and suggest changes to them. See also the forking section.
- Personalization: the option to let project repositories be owned by either individuals or groups
How to approach GitHub
At CMBI, we use the GitHub server for our projects.
It allows us to make quick changes to the code on one machine and to download them on another.
The web interface is also used as a discussion platform. (see also the pull request section)
Issues can be viewed and submitted at https://github.com/cmbi/<project name>/issues
.
The two main protocols we use to interact with the server are HTTPS and SSH. SSH has the advantage that people can deploy keys on the server, removing the need for password prompts.
Creating an Account
Anyone can make his/her own GitHub account by signing up at https://github.com/. It's free. Simply enter a username e-mail address and password.
Getting added to the CMBI Organisation
In order to make projects for the CMBI and take advantage of its privileges, your account needs to be added to the list of people at https://github.com/orgs/cmbi/people. To have your account added, contact the current administrator of the CMBI organisation on GitHub and make a request to be invited.
Creating a new CMBI Project (Repository)
Any registered GitHub user can create a repository under his/her own account.
That is explained at https://guides.github.com/activities/hello-world/.
However, the policy is that CMBI projects are created as a repository inside the CMBI GitHub organisation.
To have a repository created for your project, contact one of the organisation's owners, listed in https://github.com/orgs/cmbi/people.
In order to see this list, you must first be added to the CMBI organisation, as explained in the CMBI section.
When you request an owner to create a new project,
you'll have to provide a name and description for the repository.
Once created, the repository will be visible at https://github.com/cmbi/<repository name>
.
Updating a Repository on the Web-Interface
Besides the commandline tools, there's also the web interface of GitHub.
Users can access their projects at https://github.com/<username>/<repository name>/
,
where the username can also be 'cmbi', if the project is owned by the organisation.
To make any changes to a project or to view private projects however, you will be asked to log in with your username and password.
Editing a single raw text file is easy.
Simply go to https://github.com/<username>/<repository name>/edit/<branch name>/<path to file>
and make the changes in the text box.
Then commit the changes on the web form.
Images and text files can be viewed at https://github.com/<username>/<repository name>/blob/<branch name>/<path to file>
.
The contents of directories can be viewed at https://github.com/<username>/<repository name>/tree/<branch name>/<path to directory>
.
Files can be uploaded at https://github.com/<username>/<repository name>/upload/<branch name>/<path to directory>/
and a new file can be created at https://github.com/<username>/<repository name>/new/<branch name>/<path to directory>/
.
These actions also require a commit.
Branches can be viewed at https://github.com/
, tough from here,
the user cannot create or merge branches.
This can only be done from the commandline or inside a pull request.
See also the branching section.
A powerful tool on the website is the release page at https://github.com/<username>/<repository name>/releases
.
There, a developer can create release-packages of his software for external users to download.
Enabling Access over SSH (optional)
SSH Access allows you to interact with github without getting password prompts all the time. On linux systems, one can easily generate an SSH key by running the following command:
Simply use the default values for everything.
After the command has executed, a public key is created at <your home directory>/.ssh/id_rsa.pub
.
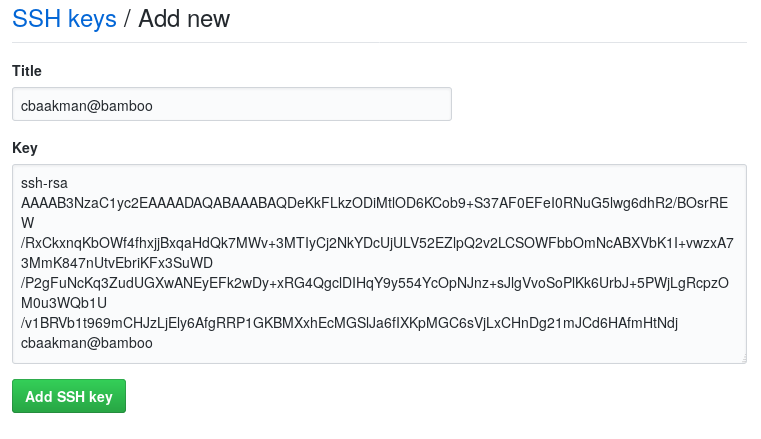
Simply copy the contents of this file and direct your browser to https://github.com/settings/ssh/new.
Enter a name for your ssh key and paste the contents of the file in the text-box labeled key
.
This is shown in figure 2.
After the key is inserted successfully, the user will be automatically authenticated from the machine where the key was generated.
Though each individual GitHub clone must be set up to use SSH. This is explained in the forking section.
The Directory Structure of a Project
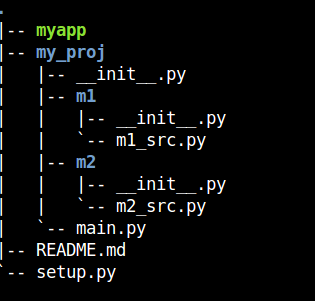
The directory structure that you want to maintain for a project depends on the programming language, software and libraries that you use. Every project should contain a readme with the general information about the project and a description of the directory structure. See also the project documentation section. It is good practice to separate code from (test) data and from results. Figure 3 shows only two examples of the many possibilities there are. For some software it's mandatory to have a certain directory structure, for other software it's optional. General rule is that you should separate files that are different and keep files that are alike together. Binaries should be separated from source files and resource files like images, html and css should also have their own directories. Data files and result files should not be included in a git repository.
Project Documentation
It's highly recommended to create a README.md file for each project. This allows others to understand the software more easily and make someone's code run without the help of the author. GitHub can visualize a README.md file that is written with hashtag-headers, like this:
Sometimes the README file is written in xml instead. GitHub can also visualize that. What a README file should contain:
- The project title and description
- Instructions on how to get started: what software needs to be installed and how to install the project's software
- Instructions on how to run tests
- Authors and aknowledgements
The Git Ignore File
The file named '.gitignore' can be present in every repository. It allows the developer to instruct git which files it should not detect changes on. This is generally used for files that contain input or output data or files that are automatically generated. The file has a simple syntax:
- Lines starting in a hashtag(#) are considered comments
- Other lines are filenames to ignore or wildcards to filenames. See also: http://tldp.org/LDP/GNU-Linux-Tools-Summary/html/x11655.htm
Project Tests
All good software projects have tests included. These are tiny files with source code that can be run to verify that the main source code is still functioning correctly. Generally we have two types of tests:
- Unit tests, that make an isolated piece of code run without any external influence. So without websites, databases or other pieces of code. Unit tests are generally very short tests and they only test about ten lines of code. They are very useful to see whether the code still does the same thing after changing a few lines.
- Integration tests, that check the code's integration with other datasources and software. These may depend on websites, installed software and large databases that may be on disk. An integration test can take longer to finish and is useful for telling wether the code still works correctly together with other datasources and software.
Working Together on a Project
Technically, two people can work on the same project by each sending their own commits to the same branch and downloading them from each other. See also the branching section. However, most of the time each person works on a separate feature or bugfix and people have to communicate on how to make every change work well with the rest of the code. This should be done by making forks of the main repository and sending pull requests, that can be reviewed by an appointed project coordinator. See also the forking section and the pull requests section.
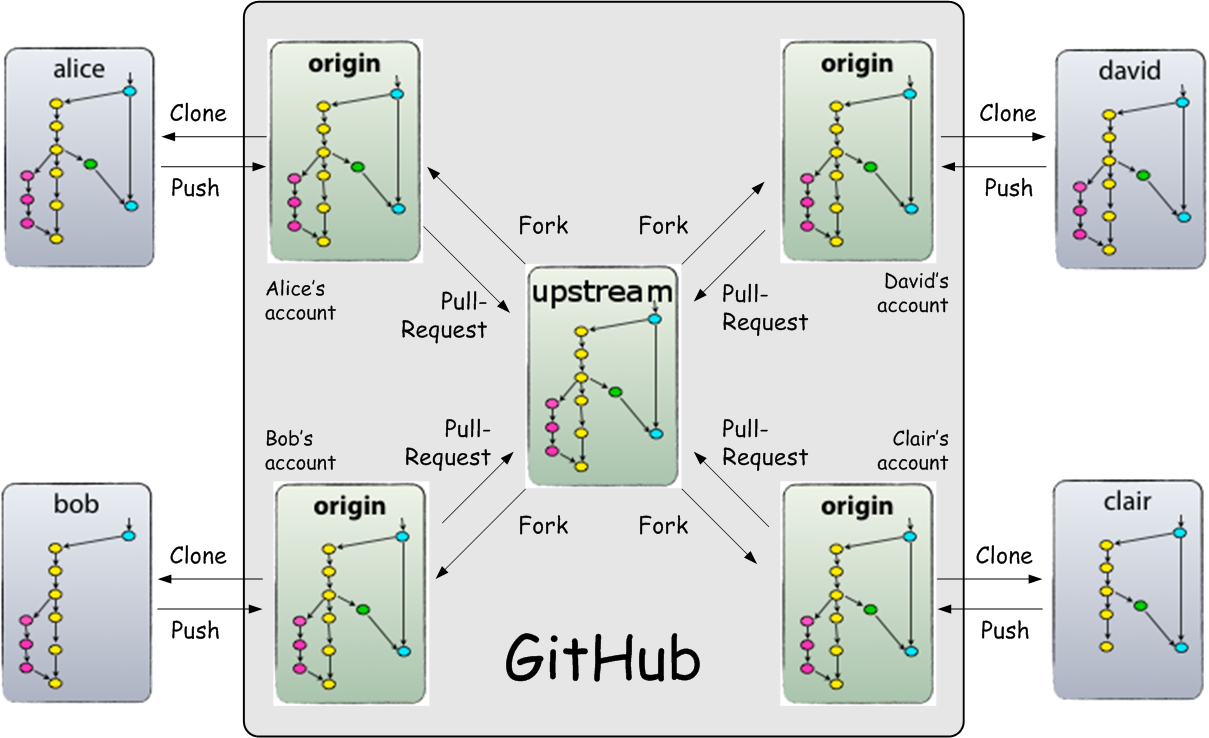
Forking a CMBI Repository
Forking is a method that allows you to keep a personalized version of a CMBI repository. This separate version is called a fork
.
Figure 4a illustrates how forking works. The idea is that each developer keeps his/her own fork and makes changes to it.
Once the developer has tested the changes and verified that everything works as supposed to, he/she sends a pull request to the
CMBI organisation.
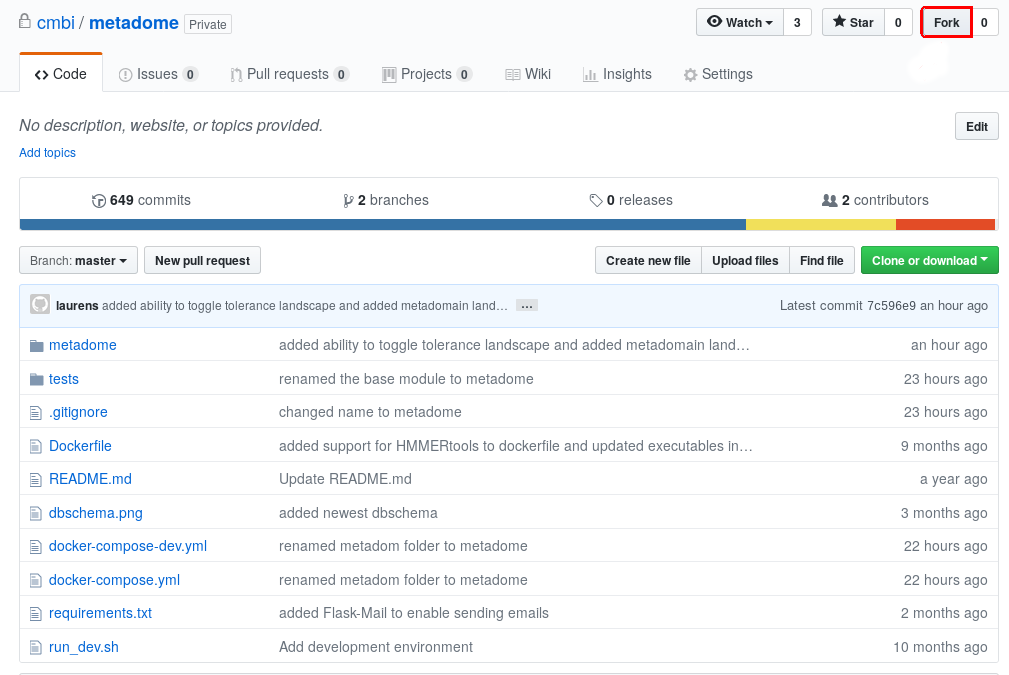
To fork a repository, navigate to the its page at https://github.com/cmbi/<repository name>
and click the fork button. (figure 4b)
Select your own developer account and GitHub will create your fork.
To clone your fork on a linux system, navigate to your projects directory and type:
Or if you're using SSH:
This will create a clone in a directory, that is named after your repository. You can make any change you want to it, which can later be uploaded to your personal fork.
It's useful to have your fork keep track of the original upstream fork, in case someone else might make changes to it. Adding a git remote allows you to download changes and update your own fork. To add the upstream CMBI fork as a remote, you must type the following inside your clone's directory:
In the branching section it will be explained how to merge your fork with the upstream fork.
Making Changes to a Repository
The git software can automatically detect changes you make to files and directories in a local clone. Simply type the following after editing a file:
It might show you something like this:
Though git detects changes, it does not automatically upload them to the repository. You'll have to decide what to do with each change first.
To undo all changes to a file, type:
To add a new file, type:
To remove a previously added file, type:
To commit changes to a previously added file, type:
Each commit is stored by git, together with your username and the time of comitting. Git also remembers the order of the commits. However, the commits you make in your clone directory are local only. To upload all local commits to the remote repository type:
origin
is a repository location that is configured by default when you make a clone.
The branch name indicates in which branch your commits will end up in the repository. This is usually the same branch you're on locally.
The git status command can tell you which branch you're on. Read the branching section for more information about branches.
Sometimes a push fails, because the remote repository has been edited by someone else or by you from a different computer. You then have to download these new commits first. To download commits that you don't have locally, type:
A pull might reveal some conflicting changes. In that case, you have to modify your files manually to resolve the conflicts and then do another commit.
Branching
As your project develops, all commits you make are added to the branch you are currently working on.
It might sometimes be handy however, to make a temporary spin-off copy of your project to make separate commits on.
This is done by making branches.
You can split off a new branch at any time and continue to work on that branch.
Figure 5 illustrates how a branch called feature
is split from the default master
branch.

By default, every repository starts with a branch named master
. You can split off a new one by typing:
This will automatically put your clone in the new local branch you've created. From then on, every commit you make will then be placed in that branch. It's good practice to split off a new branch for every new feature you add to a project and for every bug fix.
To switch back to a different, existing branch, type:
The git checkout command only creates local branches however. These are limited to your clone. You can upload a local branch to a remote branch by specifying a name in the git push command. Explained in the changes section. To locally fetch remote branches from a repository, type:
Or if you added a remote called upstream
as indicated in the forking section, type:
To view all of your remote branches in a particular repository, visit https://github.com/<your user name>/<your repository name>/branches
.
To view all of your local branches, type:
It's also possible to merge two branches. To merge a local branch into your current local branch, type:
To merge a remote fetched
branch into your current local branch, type:
Or, if working together with other developers and using an upstream fork:
Contributers to CMBI projects are supposed to create new branches for every feature they wish to add and for every bug they wish to fix. It's habit that they upload their changes from such a feature branch, not from the master branch.
Sending a Pull Request
Developers that are not owner of the CMBI organisation can't modify the project repositories directly. That's why they have to fork them instead. Read the forking section to learn about forks. When you have made changes in your personal fork and you want it to be merged with the CMBI's fork, you can create a pull request. This is a digital request that allows GitHub users to exchange commits and communicate. The owner of a repository can choose whether to include the commits or not. Figure 4a also illustrates how pull requests work.
Pull requests to CMBI repositories are typically created from a custom branch on a personal fork.
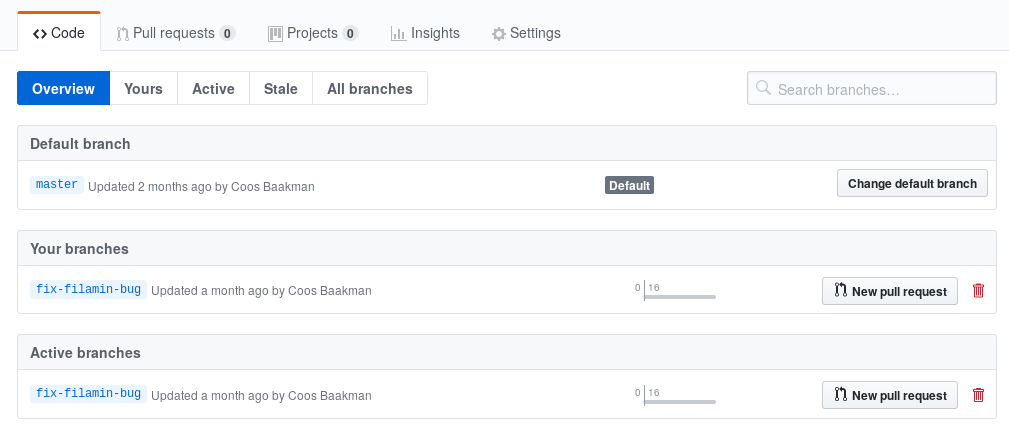
To make a pull request, you must visit the GitHub branches page at https://github.com/<your user name>/<your repository name>/branches
.
(figure 6a)
There you will find the buttons for creating a pull request to the main fork.
Simply choose which branch and fork should merge with with other branch and fork and leave a title and comment.
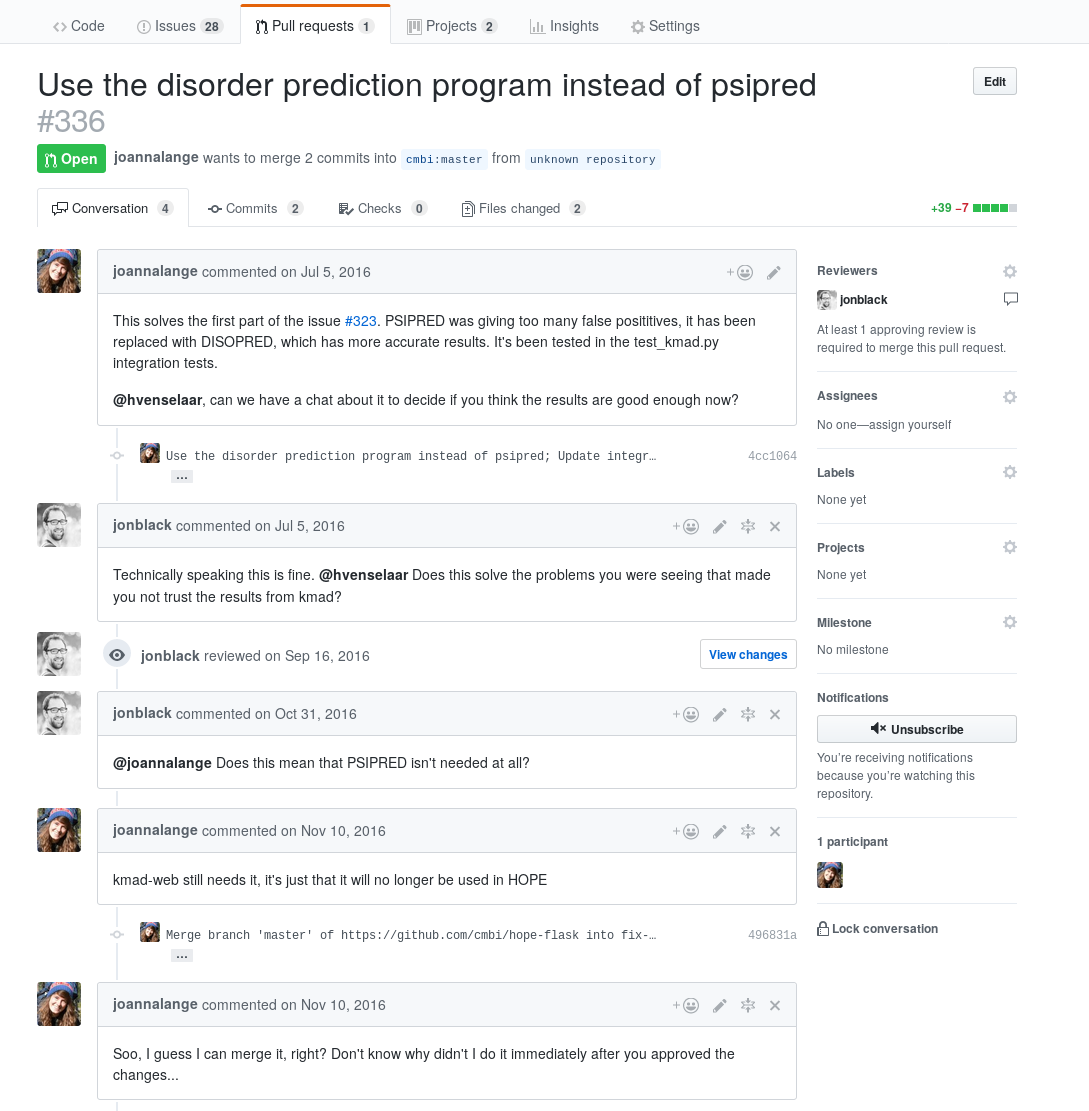
Once your pull request is created, you should wait for one of the CMBI owners to review your changes.
He/She will then either approve the pull request, allowing you to merge it, or leave a comment, requesting additional changes. (figure 6b)
Visit https://github.com/cmbi/<your repository name>/pulls
to see the status of all your active pull requests. You will also be notified by e-mail if anything is updated.
Be clear in your pull requests. Let the CMBI owners know why you make changes and how you fixed certain bugs. This reduces the need for additional questions and increases the chance that your changes will be approved.
For further reading, see:
- https://git-scm.com/docs/gittutorial
- https://stackoverflow.com
- https://guides.github.com/
- https://blog.github.com/
- https://git-scm.com/book/en/v2/Getting-Started-Git-Basics
- https://nvie.com/posts/a-successful-git-branching-model/
Reference Materials: